Hi there,
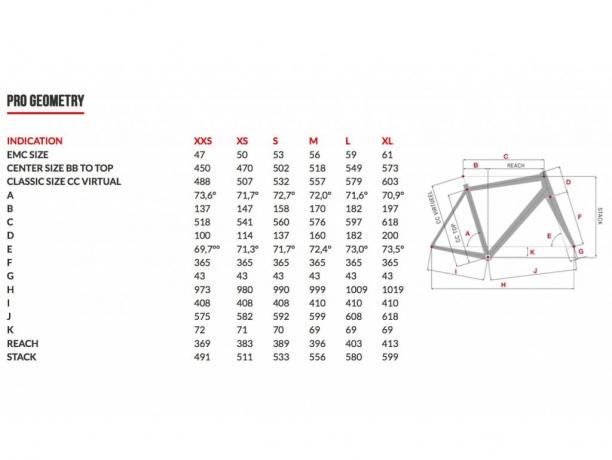
As a little project for myself to try and get the hang of using BikeCAD Pro, I found a bike I like the look of and got all its available dimensions as seen in the attached picture. I'm wanting to practice drawing up, but on some dimensions when I put it in alters some others! So how can I stop that happening? Also is there away of altering the the dimensions from the drawing screen rather than the primary dimensions box?
Your help will be most appreciated.
Thank you
Darren


It looks like the specs you've chosen are for the 2015 XXS Eddy Merckx San Remo 76. I've just modeled this bike for you. You can see the BikeCAD model at: bikecad.ca/1465770445416.
One thing I should make clear is that when you enter a dimension into BikeCAD, that value is essentially locked. It will not change unless you change it again yourself. I suspect the source of your confusion is where you have the option to control the front end geometry by Effective top tube length and top tube angle, Front center distance and head tube length, Handlebar position in X and Y coordinates from the BB or by Stack and Reach. This is explained at: bikecad.ca/toptube_frontcenter.
The concept might be more easily understood if we look at a simpler example such as BB drop and BB height. The menu for entering these values is shown below.
It is only possible to control the position of the bottom bracket by BB drop OR by BB height. If you enter a value for BB drop but then change the menu to BB height, you will have to surrender direct control of the BB drop. You cannot control both of these dimensions at the same time as BB height is simply equal to Rear wheel radius minus BB drop and BB drop is equal to Rear wheel radius minus BB height.
When trying to match dimensions from a geometry chart, it might be tempting to directly input values for Effective top tube length, Front center, head tube length, stack and reach all at once if all of these dimensions are provided. However, doing so is just as futile as trying to enter a new value for BB height when the BB drop and the Rear wheel radius have already been established.
In my attempts to reproduce the XXS dimensions for the Eddy Merckx San Remo 76, I chose to define the front end geometry by Front center and head tube length. I also directly input most of the other dimensions provided such as chain stay length, seat tube length, seat angle, head angle, fork length and rake. Once I'd done all that, stack and reach as well as setback and effective top tube length had pretty much fallen into place.
If any of these remaining dimensions are still not quite right, you can still tweak unpublished dimensions like headset lower stack height, tube extensions as well as tube diameters to make the remaining values match up. Another thing I did to massage these final values was recognize that the geometry chart lists linear dimensions as integers and angular dimensions with one decimal place. This means that a dimension published as 72mm might actually be 72.4mm.
In the end, I was not able to match all the dimensions perfectly. I've shown in the diagram below, most of the dimensions are correct as I've indicated with a checkmark. However, the stack was off by a millimeter and the effective top tube length was off by 3mm. This is not too alarming as geometry charts are not always perfect.
As for clicking on dimensions in the drawing to change their values, it is not currently an option to do that. You must change dimensions through their respective dialog boxes.
For another discussion on the topic of matching dimensions from spec sheets, see: bikecad.ca/retul_specs.
Thanks for that, I've managed to get a lot closer to the make now, so I'll try the next size up and see how I get on, and just keep practicing. I think I'll need a bit, but I'm sure I'll get there.
Thanks again
Darren
Only me again, I've moved on to the XS frame now and am struggling again! Is there a better order of putting in the dimentions to get the results I'm after?
The order in which you enter the dimensions has no bearing on the final design. I have just modeled the 2015 San Remo 76 in size XS. As you can see below, I was able to match all but one dimension.
Besides playing with tube extensions, I also offset the seat tube by 13mm at the bottom bracket. Had I only offset the seat tube by 11mm, I would have achieved the desired 541mm for effective top tube length, but then the setback would have been 2mm too long.
I mentioned earlier that geometry charts are not always perfect. Case in point, the stack and reach dimensions are incorrectly represented on the Eddy Merckx diagram. Stack and Reach are shown attaching to the intersection of the top tube and head tube when in fact they should be going to the top of the head tube. I considered the possibility that they had their own distinct definition for stack and reach. However, if stack and reach are meant to be measured as shown in the Eddy Merckx diagram, then effective top tube length (C) would simply be the sum of setback (B) and reach and those numbers do not add up in the Eddy Merckx geometry chart.